Transfer TELUS eSIM to a new phone in Canada can feel confusing at first, especially when QR codes, activation steps, and device transfers are involved.
Upgrading to a new phone is exciting until it’s time to move your existing TELUS eSIM and mobile number over to the new device. If you’re using TELUS eSIM, the transfer process can feel a little confusing at first, especially if you’re switching between iPhone and Android devices or dealing with QR codes for the first time.
The good news is that transferring a TELUS eSIM to a new phone in Canada is usually pretty straightforward once you know what to expect. In some situations, the transfer can happen automatically, while other setups may require a new QR code or manual activation through TELUS.
In this guide, I’ll walk you through how to transfer a TELUS eSIM between phones, what to expect during activation, common transfer problems, and how to avoid the most frustrating setup mistakes.
If you’re setting up TELUS eSIM for the first time instead of moving an existing line, follow our How to Activate TELUS eSIM in Canada guide.

Before You Transfer Your TELUS eSIM
Before moving your TELUS eSIM to another phone, take a few minutes to prepare properly. Most transfer problems happen because users remove the old eSIM too early or try activating the new device without stable Wi-Fi.
Here are a few important things to check before starting:
- Make sure your new phone supports eSIM
- Keep both phones nearby during setup
- Connect both devices to stable Wi-Fi
- Keep your current phone active until the transfer finishes
- Save your TELUS QR code or activation details somewhere safe
- Avoid deleting your old eSIM before the new one is fully working
Some TELUS eSIM transfers may also require a brand-new QR code or replacement activation voucher depending on your device and transfer method.
If you’re not sure whether your device supports eSIM, check our full guide to eSIM-compatible phones in Canada before starting the transfer process.
How to Transfer a TELUS eSIM Between iPhones
Moving your TELUS eSIM from one iPhone to another is usually the easiest type of transfer because Apple supports eSIM Quick Transfer on newer iPhones.
In many cases, your TELUS eSIM can transfer directly during iPhone setup without manually scanning a QR code.
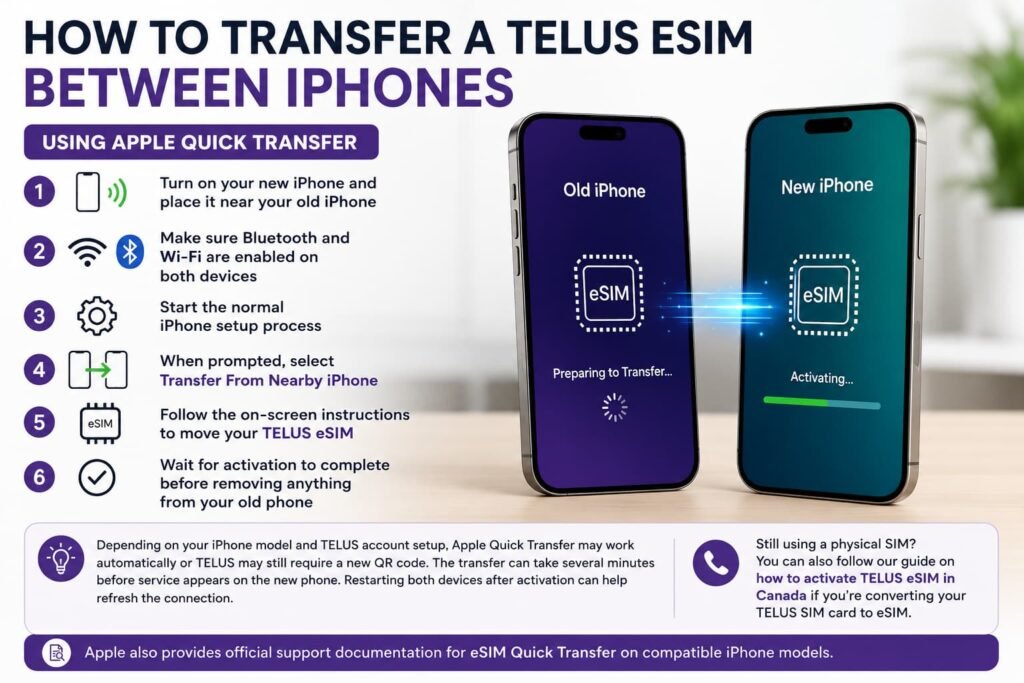
Transfer TELUS eSIM Using Apple Quick Transfer
- Turn on your new iPhone and place it near your old iPhone
- Make sure Bluetooth and Wi-Fi are enabled on both devices
- Start the normal iPhone setup process
- When prompted, select Transfer From Nearby iPhone
- Follow the on-screen instructions to move your TELUS eSIM
- Wait for activation to complete before removing anything from your old phone
Depending on your iPhone model and TELUS account setup, Apple Quick Transfer may work automatically or TELUS may still require a new QR code.
Some users also notice the transfer takes several minutes before service appears on the new phone. Restarting both devices after activation can help refresh the connection.
Still using a physical SIM? You can also follow our guide on how to activate TELUS eSIM in Canada if you’re converting your TELUS SIM card to eSIM for the first time.
Apple also provides official support documentation for eSIM Quick Transfer on compatible iPhone models.
How to Transfer a TELUS eSIM to a New Android Phone
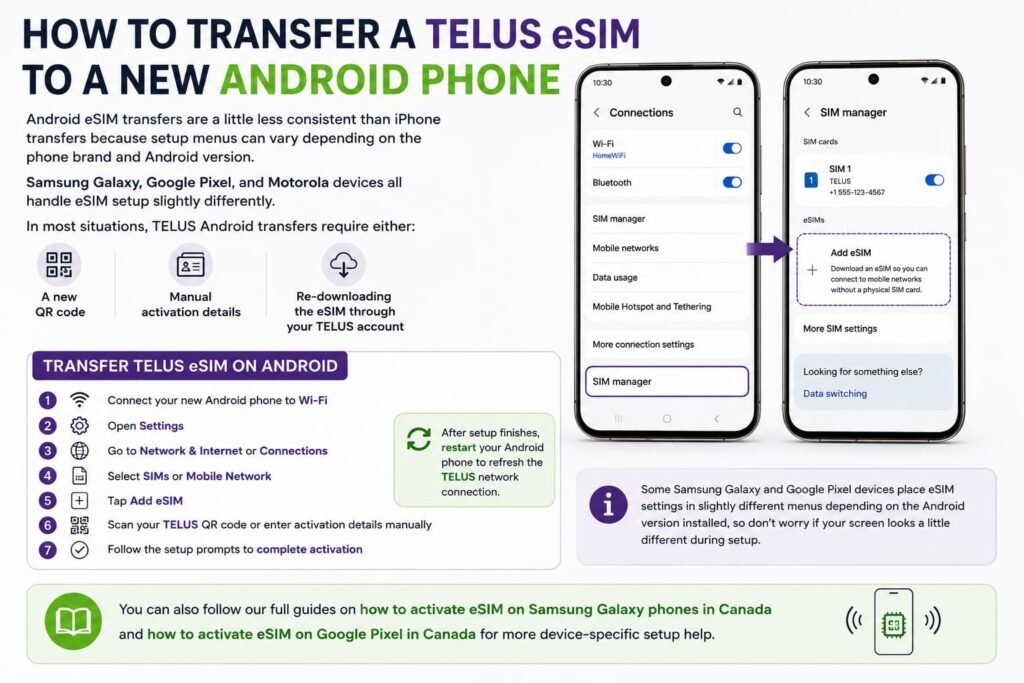
Android eSIM transfers are a little less consistent than iPhone transfers because setup menus can vary depending on the phone brand and Android version.
Samsung Galaxy, Google Pixel, and Motorola devices all handle eSIM setup slightly differently.
In most situations, TELUS Android transfers require either:
- A new QR code
- Manual activation details
- Re-downloading the eSIM through your TELUS account
Transfer TELUS eSIM on Android
- Connect your new Android phone to Wi-Fi
- Open Settings
- Go to Network & Internet or Connections
- Select SIMs or Mobile Network
- Tap Add eSIM
- Scan your TELUS QR code or enter activation details manually
- Follow the setup prompts to complete activation
After setup finishes, restart your Android phone to refresh the TELUS network connection.
Some Samsung Galaxy and Google Pixel devices place eSIM settings in slightly different menus depending on the Android version installed, so don’t worry if your screen looks a little different during setup.
You can also follow our full guides on how to activate eSIM on Samsung Galaxy phones in Canada and how to activate eSIM on Google Pixel in Canada for more device-specific setup help.
Can You Transfer a TELUS eSIM Without a QR Code?
Sometimes.
Apple Quick Transfer may move your TELUS eSIM automatically between iPhones without needing a new QR code. However, many transfers still require TELUS to issue a replacement activation code or new QR voucher.
Android transfers are more likely to require manual activation or a replacement QR code from TELUS.
If your QR code no longer works, expires, or fails during activation, TELUS support may need to reset the eSIM on their side before you can complete setup.
Still having trouble getting your TELUS eSIM activated? Our guide on what to do when eSIM activation fails in Canada covers the most common setup and connection issues on iPhone and Android devices before you request a replacement code from TELUS.
TELUS also provides official eSIM support information for compatible devices and activation methods through their official support portal, which can be helpful for additional setup instructions, account-specific activation steps, or troubleshooting assistance.
Does TELUS Charge for eSIM Transfers?
In some situations, TELUS may charge a fee for replacement eSIM vouchers or SIM swaps when moving your service to another phone.
The exact cost can vary depending on:
- Your account type
- Whether the transfer is completed online or in-store
- The type of device you’re activating
- Whether a replacement QR code is required
Some users complete the transfer directly through self-serve tools without additional charges, while others may need assistance from TELUS support.
Before removing your current eSIM, make sure your new phone is fully ready for activation. In many cases, TELUS may require a brand-new QR code when transferring service to another device.
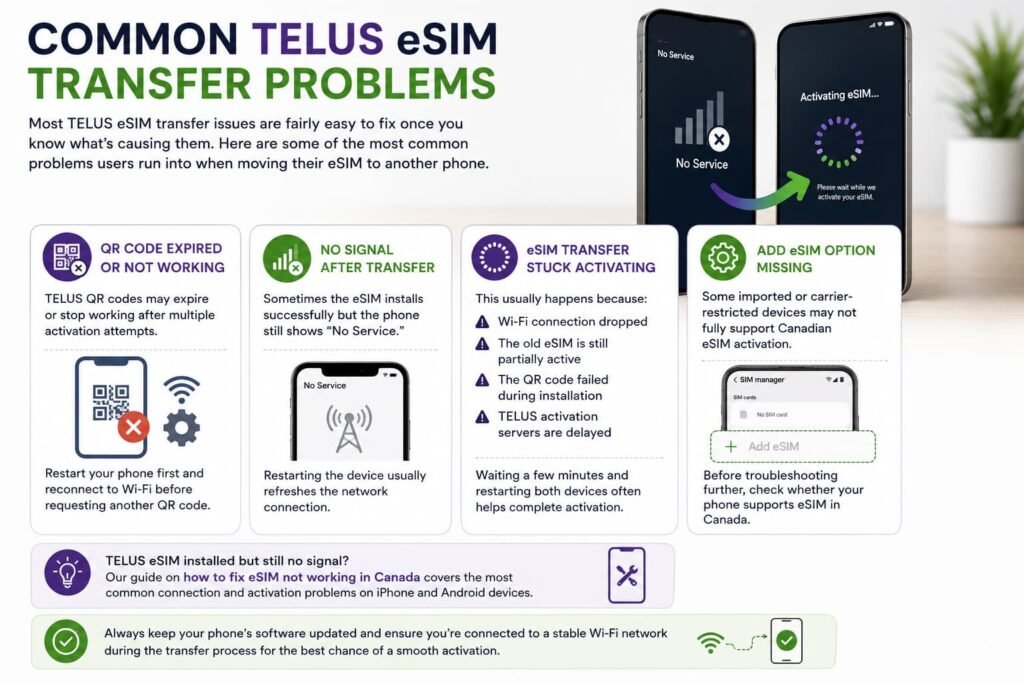
Common TELUS eSIM Transfer Problems
Most TELUS eSIM transfer issues are fairly easy to fix once you know what’s causing them.
Here are some of the most common problems users run into when moving their eSIM to another phone.
QR Code Expired or Not Working
TELUS QR codes may expire or stop working after multiple activation attempts. Restart your phone first and reconnect to Wi-Fi before requesting another QR code.
No Signal After Transfer
Sometimes the eSIM installs successfully but the phone still shows “No Service.” Restarting the device usually refreshes the network connection.
TELUS eSIM installed but still no signal? Our guide on how to fix eSIM not working in Canada covers the most common connection and activation problems on iPhone and Android devices.
eSIM Transfer Stuck Activating
This usually happens because:
- Wi-Fi connection dropped
- The old eSIM is still partially active
- The QR code failed during installation
- TELUS activation servers are delayed
Waiting a few minutes and restarting both devices often helps complete activation.
Add eSIM Option Missing
Some imported or carrier-restricted devices may not fully support Canadian eSIM activation.
Before troubleshooting further, check whether your phone supports eSIM in Canada.
Old Phone Was Reset Too Early
One of the most common mistakes is erasing the old phone before the TELUS eSIM transfer fully completes.
Whenever possible:
- Keep the old phone powered on
- Leave the original eSIM active
- Confirm calls, texts, and data work on the new device first
What to Do if Your TELUS eSIM Transfer Fails
If the transfer fails completely, don’t panic. Most eSIM issues can be fixed without losing your number.
Try these steps:
- Restart both phones
- Reconnect to stable Wi-Fi
- Retry the activation process
- Re-download the TELUS eSIM if available
- Request a replacement QR code from TELUS
- Contact TELUS support if activation remains stuck
Avoid deleting your original eSIM until your new phone is fully connected and working properly.
Deleted your TELUS eSIM accidentally? You can also follow our guide on how to reinstall or reactivate an eSIM in Canada.
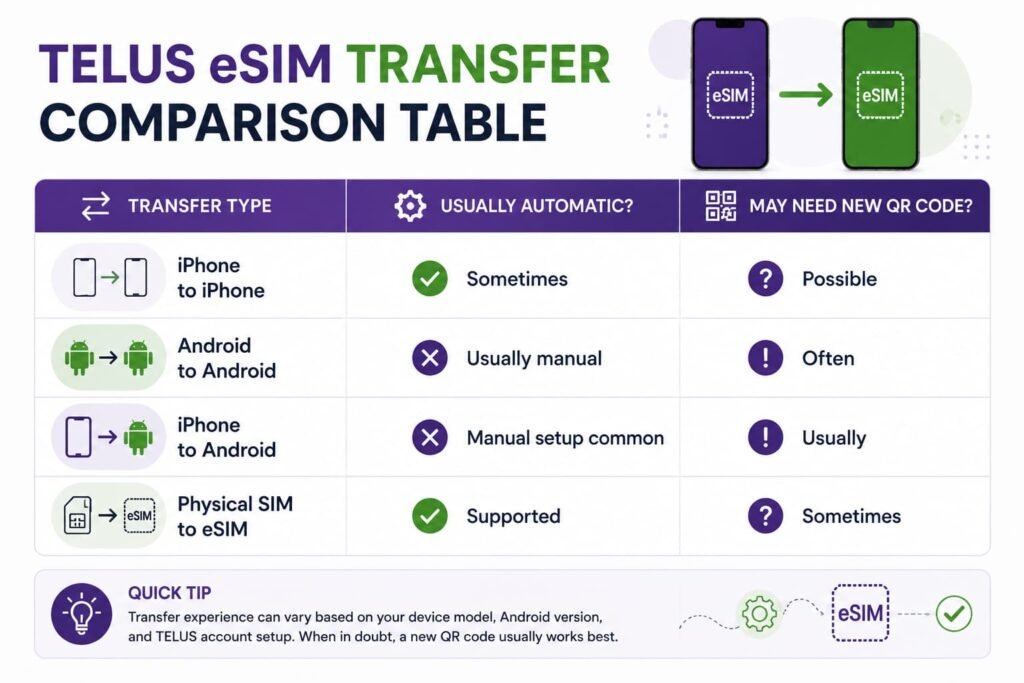
TELUS eSIM Transfer Comparison Table
| Transfer Type | Usually Automatic? | May Need New QR Code? |
|---|---|---|
| iPhone to iPhone | Sometimes | Possible |
| Android to Android | Usually manual | Often |
| iPhone to Android | Manual setup common | Usually |
| Physical SIM to eSIM | Supported | Sometimes |
Frequently Asked Questions About TELUS eSIM Transfers
How does a TELUS eSIM transfer work when switching phones?
Transferring a TELUS eSIM to another phone usually involves activating your mobile service again on the new device using either Apple Quick Transfer, a TELUS QR code, or manual activation details. The exact process can vary depending on whether you’re moving between iPhones, Android devices, or switching between operating systems. In many situations, keeping both phones connected to Wi-Fi and leaving the old device active during setup helps avoid activation problems.
Does TELUS charge to transfer an eSIM to another phone?
Some TELUS eSIM transfers may require a replacement QR code or eSIM voucher, which can involve additional fees depending on your account type and how the transfer is completed. Online self-serve transfers may work differently from in-store or support-assisted activations. Since TELUS policies can change over time, checking current transfer fees before starting the process can help avoid surprises later on.
What’s the easiest way to transfer a TELUS eSIM without scanning a QR code?
Newer iPhones sometimes support Apple Quick Transfer, which can move your TELUS eSIM automatically during device setup without manually scanning a QR code. Other transfer situations, especially on Android devices, may still require a new QR code or manual activation details from TELUS before service can be activated on the new phone.
Is moving a TELUS eSIM from iPhone to Android harder?
Transfers between iPhone and Android devices are usually more manual than iPhone-to-iPhone transfers. In many situations, TELUS will require a new activation process using a replacement QR code or manual setup details. Android devices can also place eSIM settings in different menus depending on the phone manufacturer and Android version installed, so setup steps may look slightly different between Samsung Galaxy, Google Pixel, Motorola, and other Android phones.
Why does a TELUS eSIM transfer get stuck on activating?
Activation problems are often caused by unstable Wi-Fi, expired QR codes, partial installation attempts, or temporary TELUS network delays during setup. Restarting both devices and reconnecting to stable Wi-Fi can often help complete the transfer successfully. In some situations, TELUS support may need to reset the eSIM activation or issue a replacement QR code before the setup can continue properly.
Can you reuse an old TELUS eSIM QR code?
Many TELUS QR codes are designed for limited activation use and may stop working after previous installation attempts or failed transfers. When this happens, TELUS may need to issue a brand-new QR code or replacement activation details before the eSIM can be installed again on another device. Saving your original activation details somewhere secure can still help during troubleshooting or reinstallation.
Why shouldn’t you delete your old TELUS eSIM too early?
Removing the original TELUS eSIM before the new phone is fully activated can interrupt calls, texts, and mobile data service. In many cases, restoring service requires a replacement QR code or additional help from TELUS support before activation can continue. Keeping the old device active until everything works properly on the new phone helps avoid most transfer-related problems.
Can the MyTELUS app help transfer an eSIM?
The MyTELUS app can sometimes help manage parts of the transfer process, including accessing account information, viewing activation details, or requesting eSIM support. Depending on the device and account setup, some transfers may still require manual activation or direct assistance from TELUS support before the eSIM can be successfully moved to another phone.
How do you recover a failed TELUS eSIM transfer?
Restarting both phones, reconnecting to strong Wi-Fi, retrying activation, and checking device compatibility are usually the best first steps when recovering a failed TELUS eSIM transfer. In more serious cases, TELUS may need to reissue activation details or reset the eSIM on their side before service can be restored. Leaving the old device active during troubleshooting often makes recovery much easier.
More Related Guides from Our eSIM Canada Series
- How to Activate TELUS eSIM in Canada
- How to Fix eSIM Not Working in Canada
- What to Do When eSIM Activation Fails in Canada
- How to Reinstall or Reactivate an eSIM in Canada
- Does My Phone Support eSIM in Canada? Compatible Phones and Devices
- How to Activate eSIM on Samsung Galaxy Phones in Canada
- How to Activate eSIM on Google Pixel in Canada
- eSIM Canada: Best Providers, Setup & Guide
- How to Activate eSIM on iPhone in Canada
- How to Activate eSIM on Android in Canada
Final Thoughts on TELUS eSIM Transfers
Transferring a TELUS eSIM to a new phone in Canada is usually straightforward once you understand how the setup process works. The biggest thing is avoiding common mistakes like deleting your old eSIM too early or starting activation without a stable Wi-Fi connection.
iPhone transfers are often smoother thanks to Apple Quick Transfer, while Android setups may require more manual activation steps depending on the device and TELUS account setup.
Keeping your QR code safe, checking device compatibility ahead of time, and following the setup process carefully can help you avoid most activation problems.
If you’re still comparing Canadian carriers or planning to use eSIM while traveling, you can also check out our full guide to eSIM Canada plans where we compare providers, setup options, coverage, and travel-friendly eSIM alternatives.
Travelers using multiple devices or switching phones frequently may also want to compare global eSIM providers like Airalo or Holafly before travelling internationally.